What is SVG?
SVG, or Scalable Vector Graphic, is a vector-based graphics in XML format which is used for the web and works with JavaScript, CSS, DOM, and other standards. Basically, an SVG image contains lines and curves, which can have any color value. However, some complicated SVG files can have embedded PNG, JPG images, or SVG image itself.
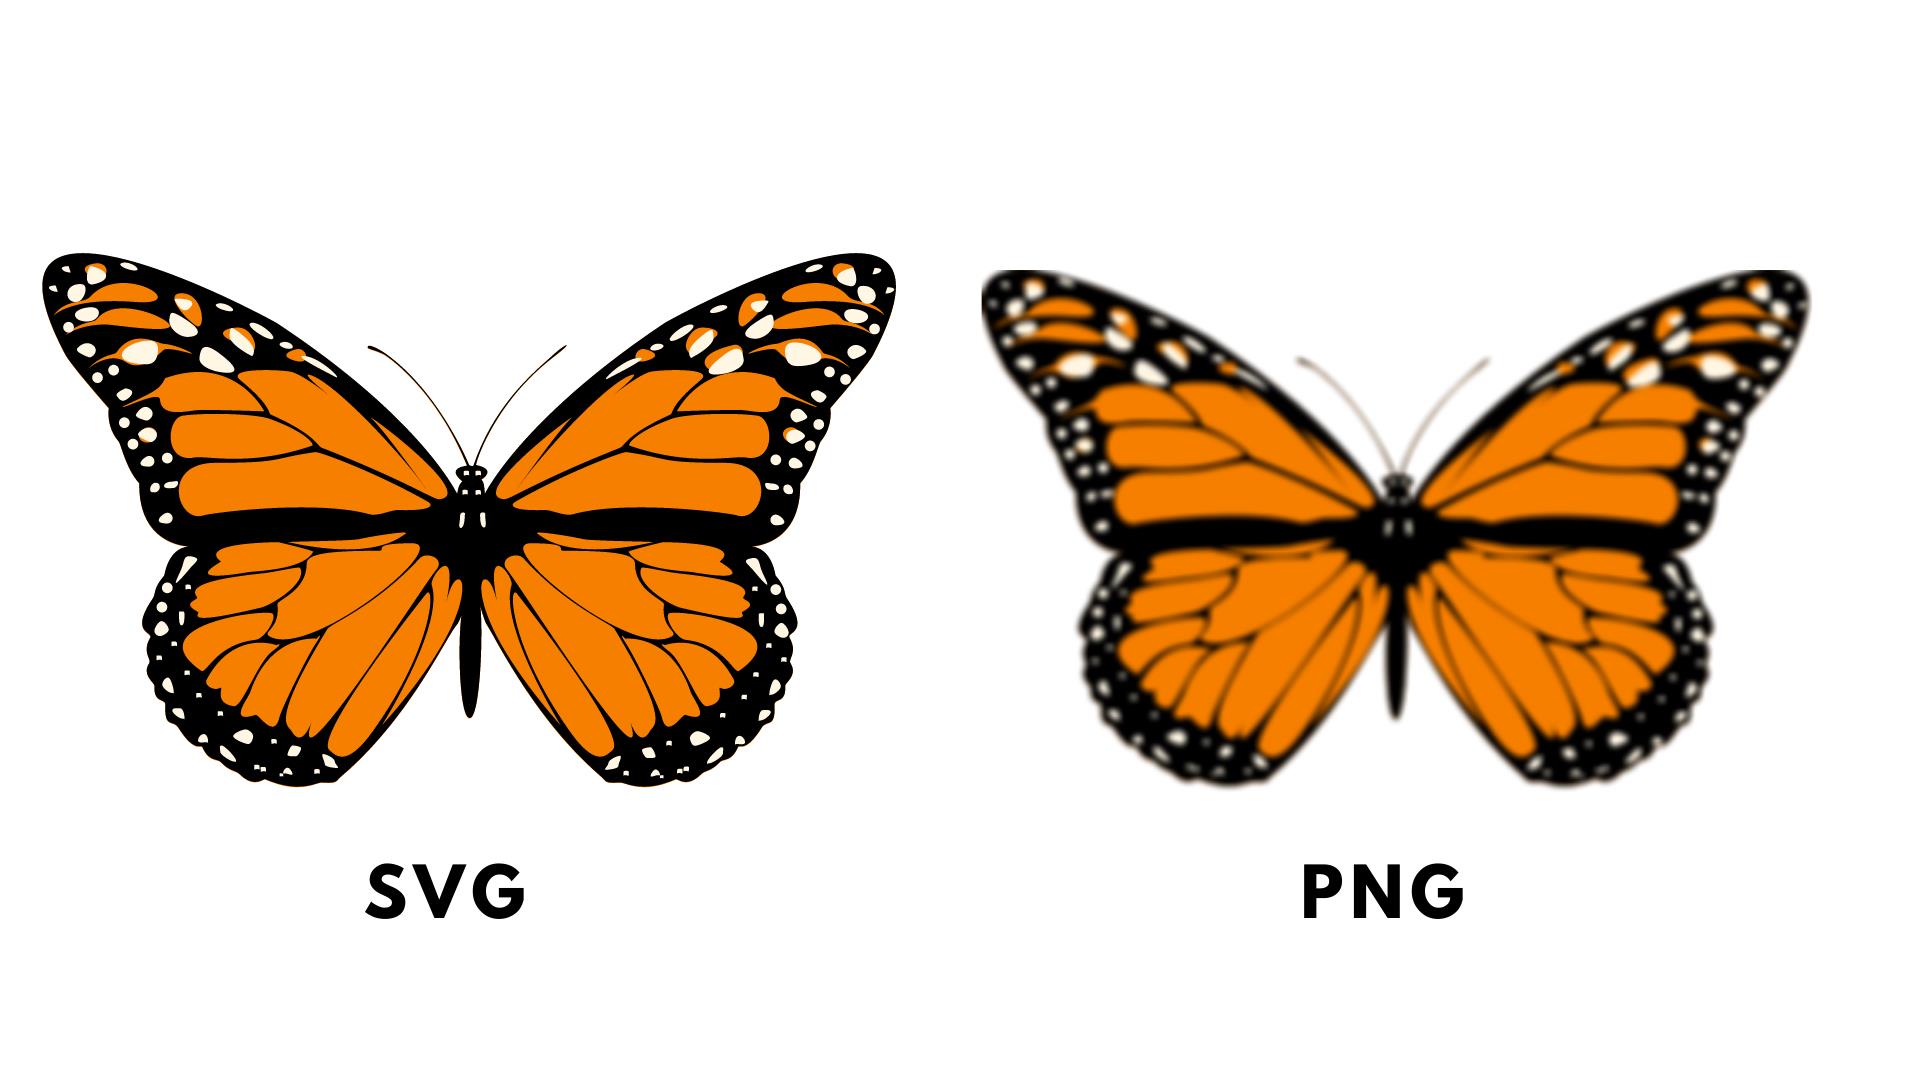
Created with XML, vector images can be scaled to any size without losing resolution and still can look like high-quality images, even in huge sizes. Unlike PNG, the larger the image, the less the quality. Let’s take a look at the example of zoomed SVG and PNG images.
What are the benefits of using SVG?
So, is SVG good for printing?
> Scalable and adaptive to all screens. All SVG assets are displayed in high quality across different screens, such as desktops, mobile devices, and tablets. Providing users with high-quality images regardless of their devices is one of the main parts of an excellent user experience.
> You can use a text editor to work with simple SVG graphics, for example, Notepad. This can significantly save you time on installing additional software and figuring out how to work with it. However, for more complex graphic configurations, you may need to use additional tools. We will provide a list of them at the end of the article.
> SVG is supported by all modern browsers, including Safari, Chrome, and Firefox.
> Compared to raster images, SVG has a smaller file size. It is known that site speed plays a crucial role. Typically, the user leaves the page if it takes longer than 3 seconds to load. Therefore, having SVG assets instead of PNG can improve this indicator.
> SVG can be not only static. Because SVG format works with JavaScript, you can create animation, which can significantly improve your website performance.
> Regardless of size, SVG images are high-quality, which is well suited for printing.
What does the SVG file consist of?
SVG file consists of text - SVG markup. Every SVG file starts with a <svg> tag, which contains the image’s width and height attributes. After this tag, you can add any shapes you need to create the desired graphic. For example, let’s start with a basic SVG image that contains only one line.
Code sample:
<!DOCTYPE html>
<html>
<body>

<svg height="210" width="500">
  <line x1="30" y1="100" x2="400" y2="20" style="stroke:rgb(115, 3, 252); stroke-width:4" />
</svg>

</body>
</html>
Result:
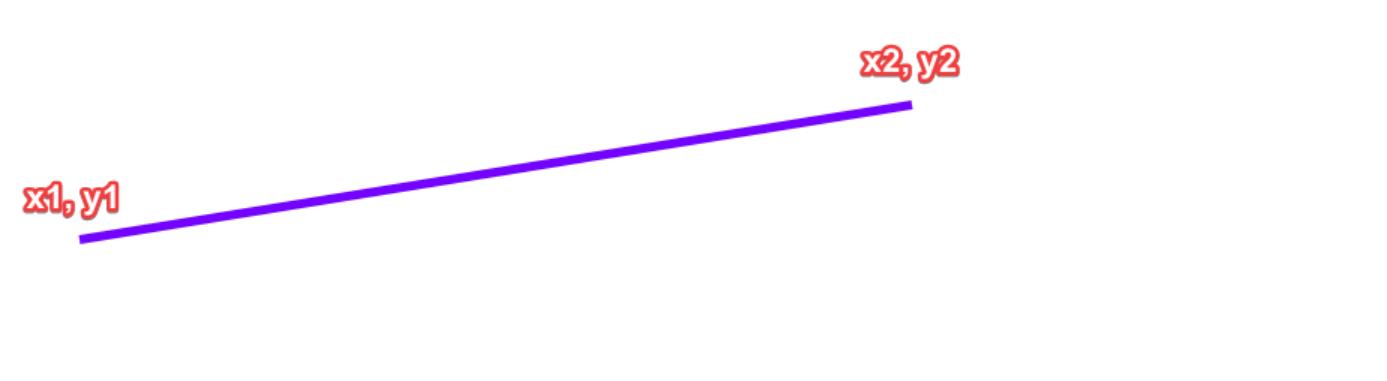
SVG uses a two-dimensional system of coordinates. This system starts from the top left corner (0,0). As you can see, the <line> contains the start point - x1,y1, the endpoint - x2,y2, style attribute defining color in RGB, and the line width. You may have already noticed that this code contains some HTML code. This means that every SVG graphics can be embedded into an HTML page directly.
Shapes
The line is just one of the basic predefined shapes which you can use for graphic creation. You can also draw other shapes like circle, rectangle, ellipse, polyline, and polygon using respective XML tags.
Code sample:
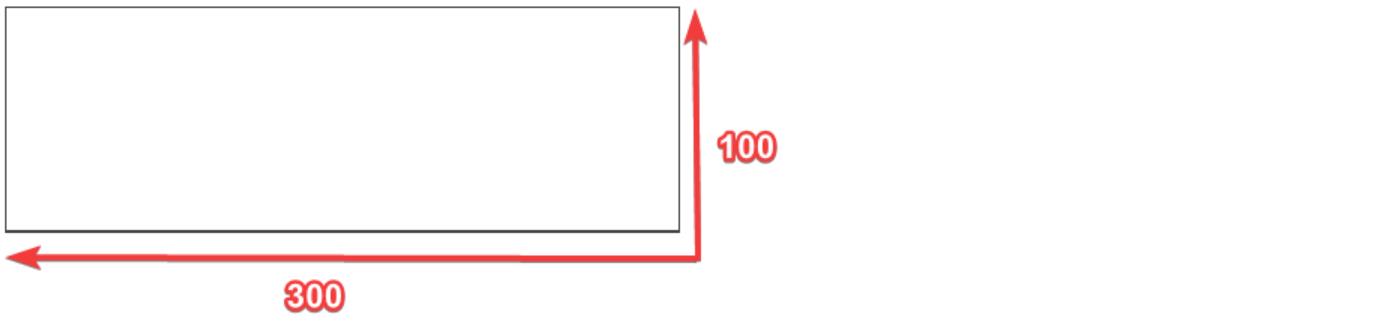
<rect width="300" height="100" style="fill:rgb(255,255,255);stroke-width:1;stroke:rgb(0,0,0)" />
Result:
Code sample:
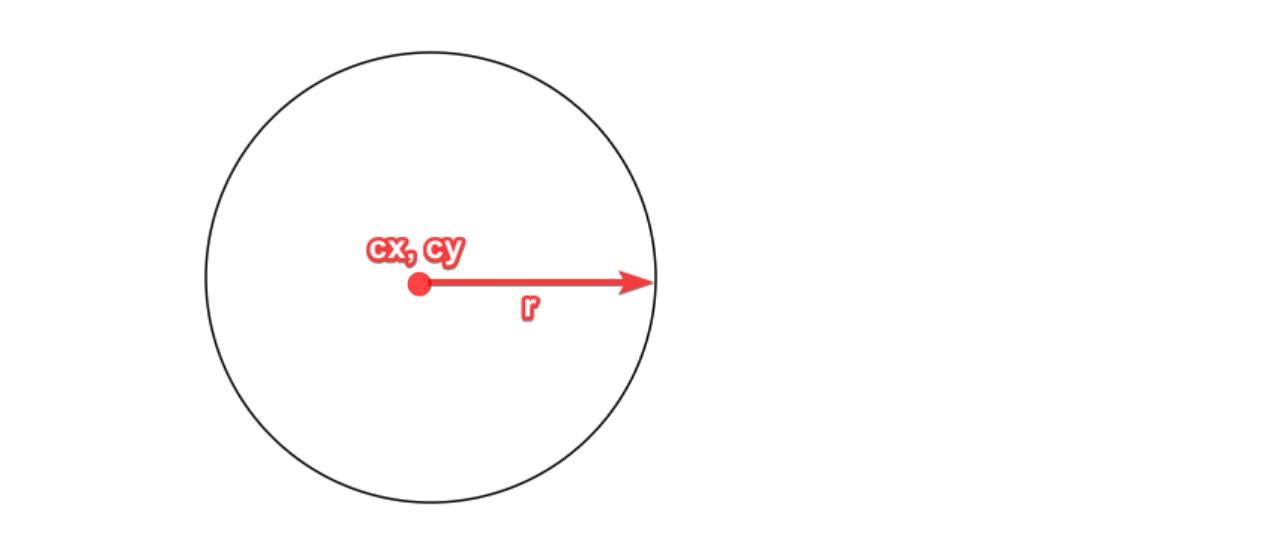
<circle cx="190" cy="120" r="100" stroke="black" stroke-width="1" fill="white" />
Result:
Code sample:
<svg height="260" width="500">
  <polygon points="230,20 270,200 130,240" style="fill:white;stroke:black;stroke-width:1" />
</svg>
Result: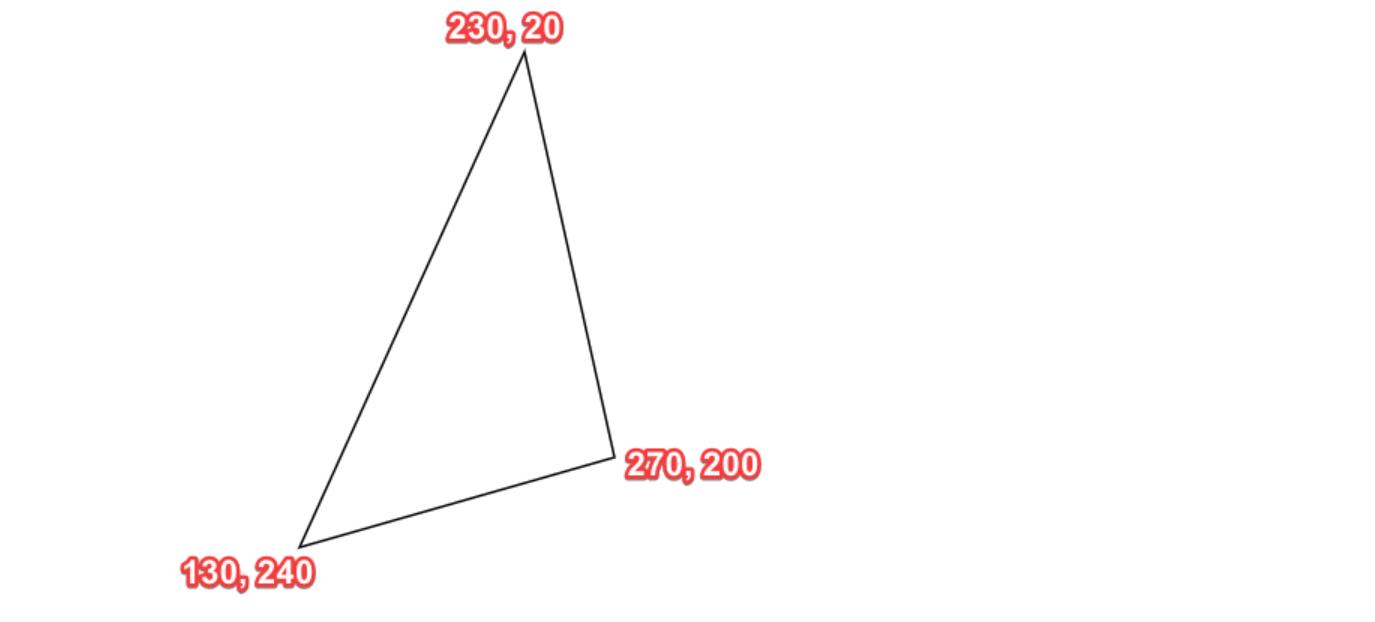
More complex shapes
Having basic shapes allows you to create plain assets. However, what if you want to create a more complicated design with unusual shapes? Here is why the <path> was created for. This attribute allows you to create curves, open and clothed paths and is one of the most adaptable SVG elements. If you want to use <path>, we recommend using professional tools for SVG creation instead of plain text editors.
The idea of <path> is that all lines or shapes are built sequentially, from one point to another point. The tag <path> has a main attribute d, which consists of commands that can create graphics.
Let’s take a look at the rectangle created using a path.
Code sample:
<svg>
    <path d="M0,0 L300,0 L300,100 L0,100 Z" style="fill:rgb(200,50,170)"/>
</svg>
M set coordinates of the first point. In our case, this point starts from the top left corner. L means draw the line from the current point to the specified one. Z is used to complete the path and closes it.
Result: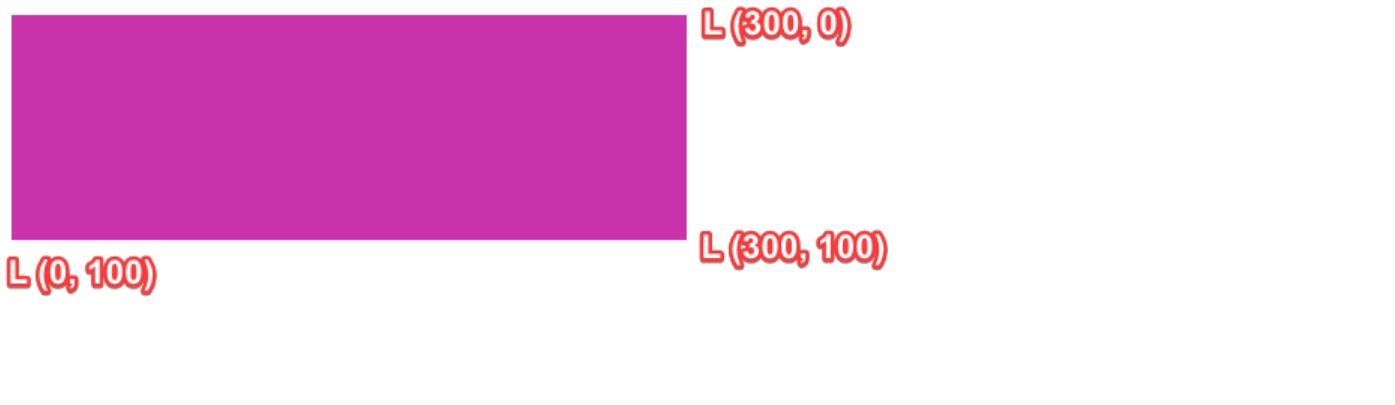
The same result you will get if you use basic shape <rect>.
Code sample:
<svg>
  <rect width="300" height="100" style="fill:rgb(200,50,170)" />
</svg>
The <path> has many other commands that allow you to draw arcs, curves, horizontal or vertical connections with two points. There are a lot of other path commands which can help you in creating SVG graphics.
Can I add text to SVG?
Yes, text can be added to SVG using the <text> tag. As for other elements, you should define coordinates for your text. Text color, size, and font values are also feasible. Please consider that font size should not be bigger than y coordinates because your text will look not entirely. You can also apply a style to your text using CSS properties. For example, font-style, font-weight, text-transform.
Text in SVG is indexed flawlessly, so it is an excellent opportunity to keep improving your SEO. Regardless this is a standalone file or file embedded in HTML, search engines can recognize the text.
Code sample:
<svg >
  <text x="80" y="60" font-size="40" font-weight="bold" fill="green"> Text here!</text>
</svg>
Result:

However, adding text through <text> tag can cause some problems with the font-family attribute. For example, when you specify a font-family that is not available on the user’s web browser or is not installed on the desktop, tablet, etc., then this font will not be displayed correctly, or a font similar to it will be used instead. This may be risky, especially for those who sell personalized products for their decoration industries struggling to satisfy customers’ needs. In Liveart, we handle this by using vectorized text. We convert TTF, WOFF, OTF, or PFB files to JS file, where every symbol has its own <path>. This approach allows displaying text correctly without the additional need to install the font.
Using vectorized text is also a good approach when you need to convert your SVG file to PNG, JPG, or PDF and use it for printing, as text elements will be displayed precisely with the font preserving.
Strokes, filters, effects, and shadows
To have your design more sophisticated, you can apply some filters, effects, and strokes. Strokes are used to define the color of a line or text. Besides color, you can set line thickness using the stroke-width property or even create dashed lines with the stroke-dasharray property.
Code sample:
<svg>
    <path stroke="black" stroke-width="6" stroke-dasharray="10,10" d="M10 20 L230 20" />
</svg>
Result:
When working with strokes outline, you may face some issues with the stroke-width attribute. By default, width changes are applied to the outside and inside and cause text thickness changes.
Old version of LiveArt HTML5 Designer (v0.10).
.gif)
Strokes in web to print require preserving the text's initial appearance - size, thickness, etc. In the last version of LiveArt Designer, this issue was solved by changing only the outside part of the stroke while saving the original text size. Having a properly configured stroke is an essential part of output generation and its further usage. Here you can check how strokes should work:
Actual version of LiveArt HTML5 Designer (v1.0).
.gif)
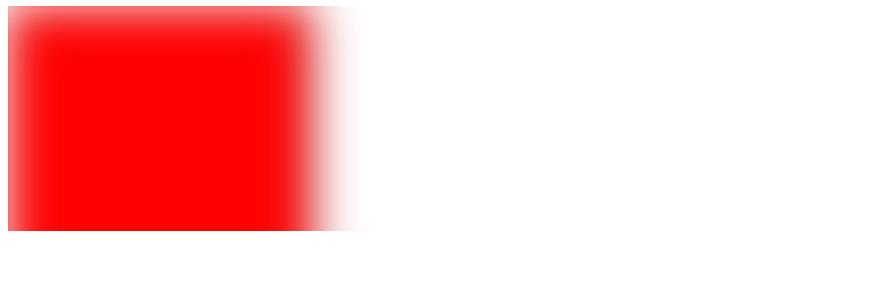
There are also a lot of filter elements that you can apply to your graphics. For example, <feGaussianBlur> for blur effect, <feOffset> for shadow effect, or <feBlend> for blending two images, and many others.
Code sample:
<svg>
<defs>
    <filter id="f0" x="0" y="0">
      <feGaussianBlur in="SourceGraphic" stdDeviation="15" />
    </filter>
</defs>
   <rect width="200" height="200" stroke="black" stroke-width="5" fill="red" filter="url(#f0)" />
</svg>
To identify the unique filter name, we should use the id attribute. You can also control the blur size with the stdDeviation attribute.
Result:
Unfortunately, filters are not supported by all browsers. Google Chrome supports filters only from version 8.0, Safari - from version 6.0, Opera - from version 9.6, Internet Explorer from version 10.0, and Firefox from version 3.0. To provide your users with a good experience, make sure that a default element (without filters) looks good.
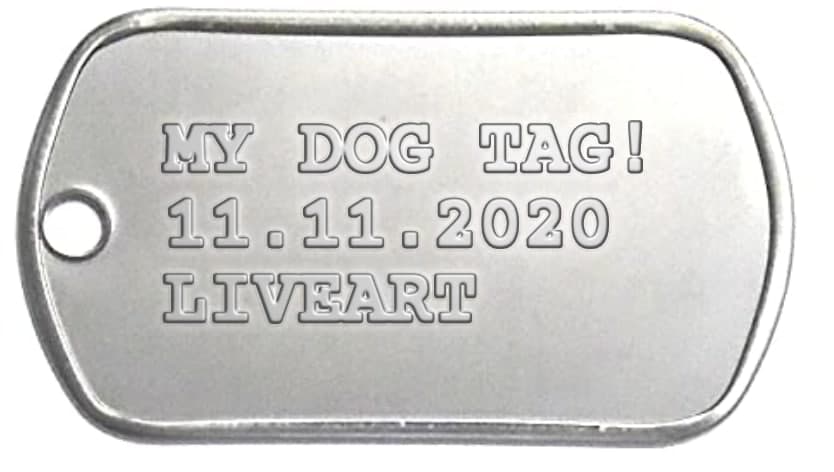
When talking about the web to print, it is quite risky to use filters for production output as we are not entirely sure that the customer’s browser will support this. However, LiveArt uses filters to visualize products and create a good impression during customization. We show some parts with thread effect for products like socks to get the product preview as real as possible. One more case where effects can be applied is custom jewelry products or custom tags. For such products, we suggest applying an effect to the text to make it more visible on the reference that will be used for the stamping.
You can achieve a stamped effect not only with SVG filters but also using CSS based on text-shadow property, yet the last one has no SVG filter flexibility and features.
More about SVG in LiveArt
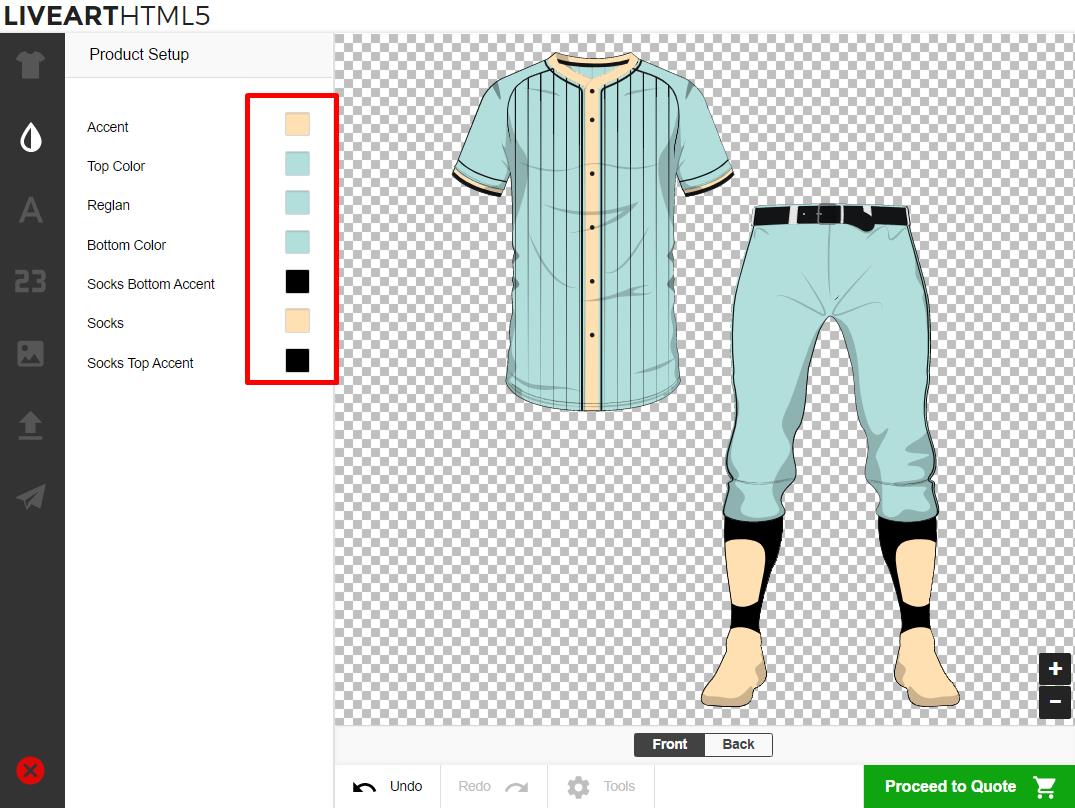
LiveArt relies on the SVG format and considers it as one of the most convenient and flexible in usage. Developing robust solutions for more than ten years, we understood that vector format is useful for our customers. Therefore, we have implemented the support of multicolored SVG graphics in our product design software, which you can use from our free artwork gallery or upload your own. SVG format allows you to resize the image to any size without getting a “Low-resolution warning.” Moreover, SVG is easy to output and ready to use without any extra conversions.
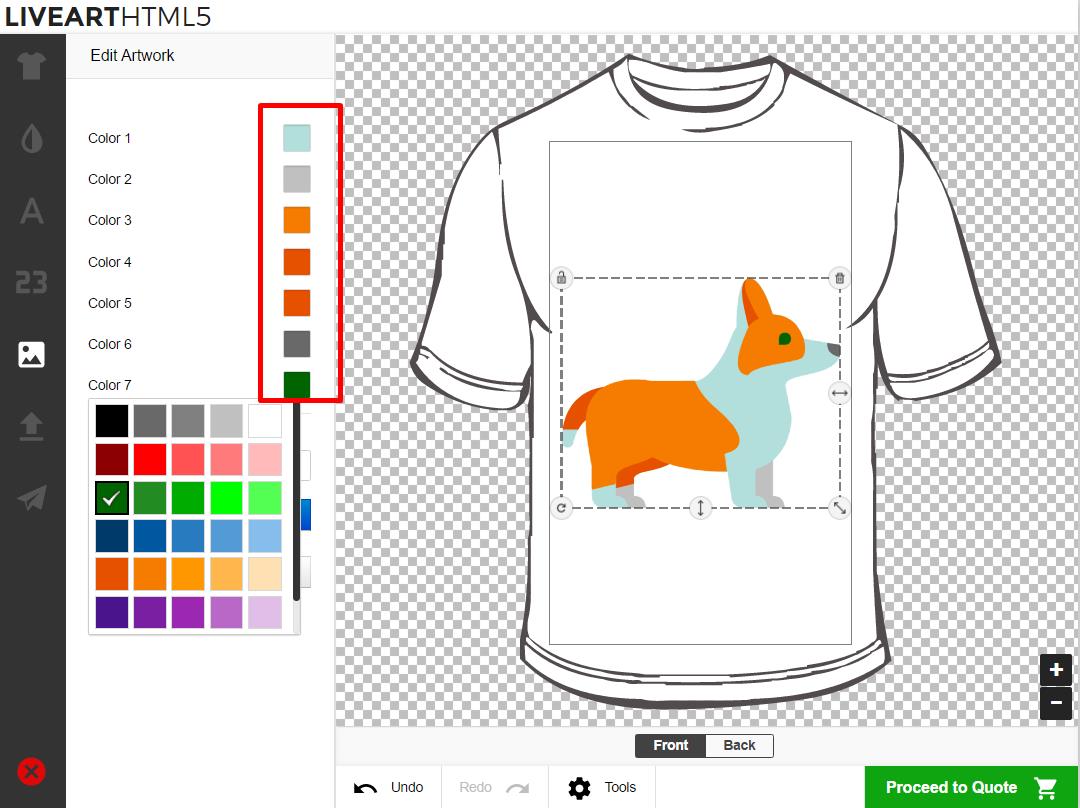
As well as graphics preparation, LiveArt also uses SVG format for product preparations, especially for multicolored uniforms. Learn more about our uniform design tool and play with the demo.
Such graphics need preliminary preparation. If you are interested in preparing vector graphics, you can check our documentation or see our YouTube video.
Free tools
Inkscape
Inkscape is an open-source tool for creating vector-based graphics. This tool allows rendering primitive shapes, changing colors, applying filters, adding text, working with paths, and object transformation. Developed for working with SVG files, this tool became one of the most popular free tools among designers and developers.
Snap.svg
Snap.svg is one of the most popular JavaScript libraries that was developed for working with SVG. It is entirely open-source, free, and not inferior in functionality to such libraries as SVG.js, Two.js, and D3.js. This library can work with existing SVG files and as well as with Snap generated. This library has a powerful API that can be useful for developers. Besides static SVG files, you can create animation and provide more engagement to your website.
Method Draw
Method Draw is a straightforward online SVG editor. You do not need to install it on your desktop because this tool is available online, and you even do not need to sign up. The interface is straightforward and easy to use but provides a robust set of tools for graphic creation. You can export graphics as SVG and PNG.
SVGOMG
SVGOMG is a free UI wrapper over SVGO that was created by Jake Archibald for optimizing and simplifying SVG images. This tool has a lot of features like removing metadata, raster images, viewbox, hidden element, and empty text, and even prettifying your markup. You can preview all changes by simply clicking on the respective buttons. This software is useful for developers and can help with SVG preparation for further work.
SVG is a compelling format that is gaining popularity every day. Each purpose has its own format, but as we have already found out, SVG is suitable for creating scalable logos, infographics, animation, illustrations, etc. In this article, we described only basic SVG features; however, this format has a wide range of other exciting features, which we will cover in the next articles. Stay tuned!
In case you need any assistance or have questions regarding SVG, you are welcome to contact us.
FAQ
> What is the best way to handle printing SVG files?
SVG file for print is best handled by ensuring the SVG is properly converted to a print-friendly format, such as PDF or EPS. This maintains the vector properties necessary for high-quality prints.
> Can SVG files be used for print?
Yes, SVG files can be used for print. They are ideal for printing due to their scalability and resolution independence, ensuring high-quality prints of any size.
> Can you print an SVG file?
Yes, you can print an SVG file. It is recommended to convert the SVG file to a PDF or another vector format to ensure the best print quality.
> How do I use SVG for printing purposes?
To use a print SVG file, make sure your design is created in a vector graphic editor and then export it as a high-resolution PDF. This will preserve the vector properties necessary for high-quality prints.